Anycubic Kossel Plus
BL / 3D Touch Setup
Hardware
- Print bracket such as: http://www.thingiverse.com/thing:2251115
- Connect White/Black wire to z-min-endstop (S = (signal - white), - = (minus - black)). Orientation doesn't matter
- Connect Brown/Red/Orange wire to servo 0 port (S = Orange, + = Red, - = Brown) NOTE: on the Tri Gorila Board + and - are reversed.

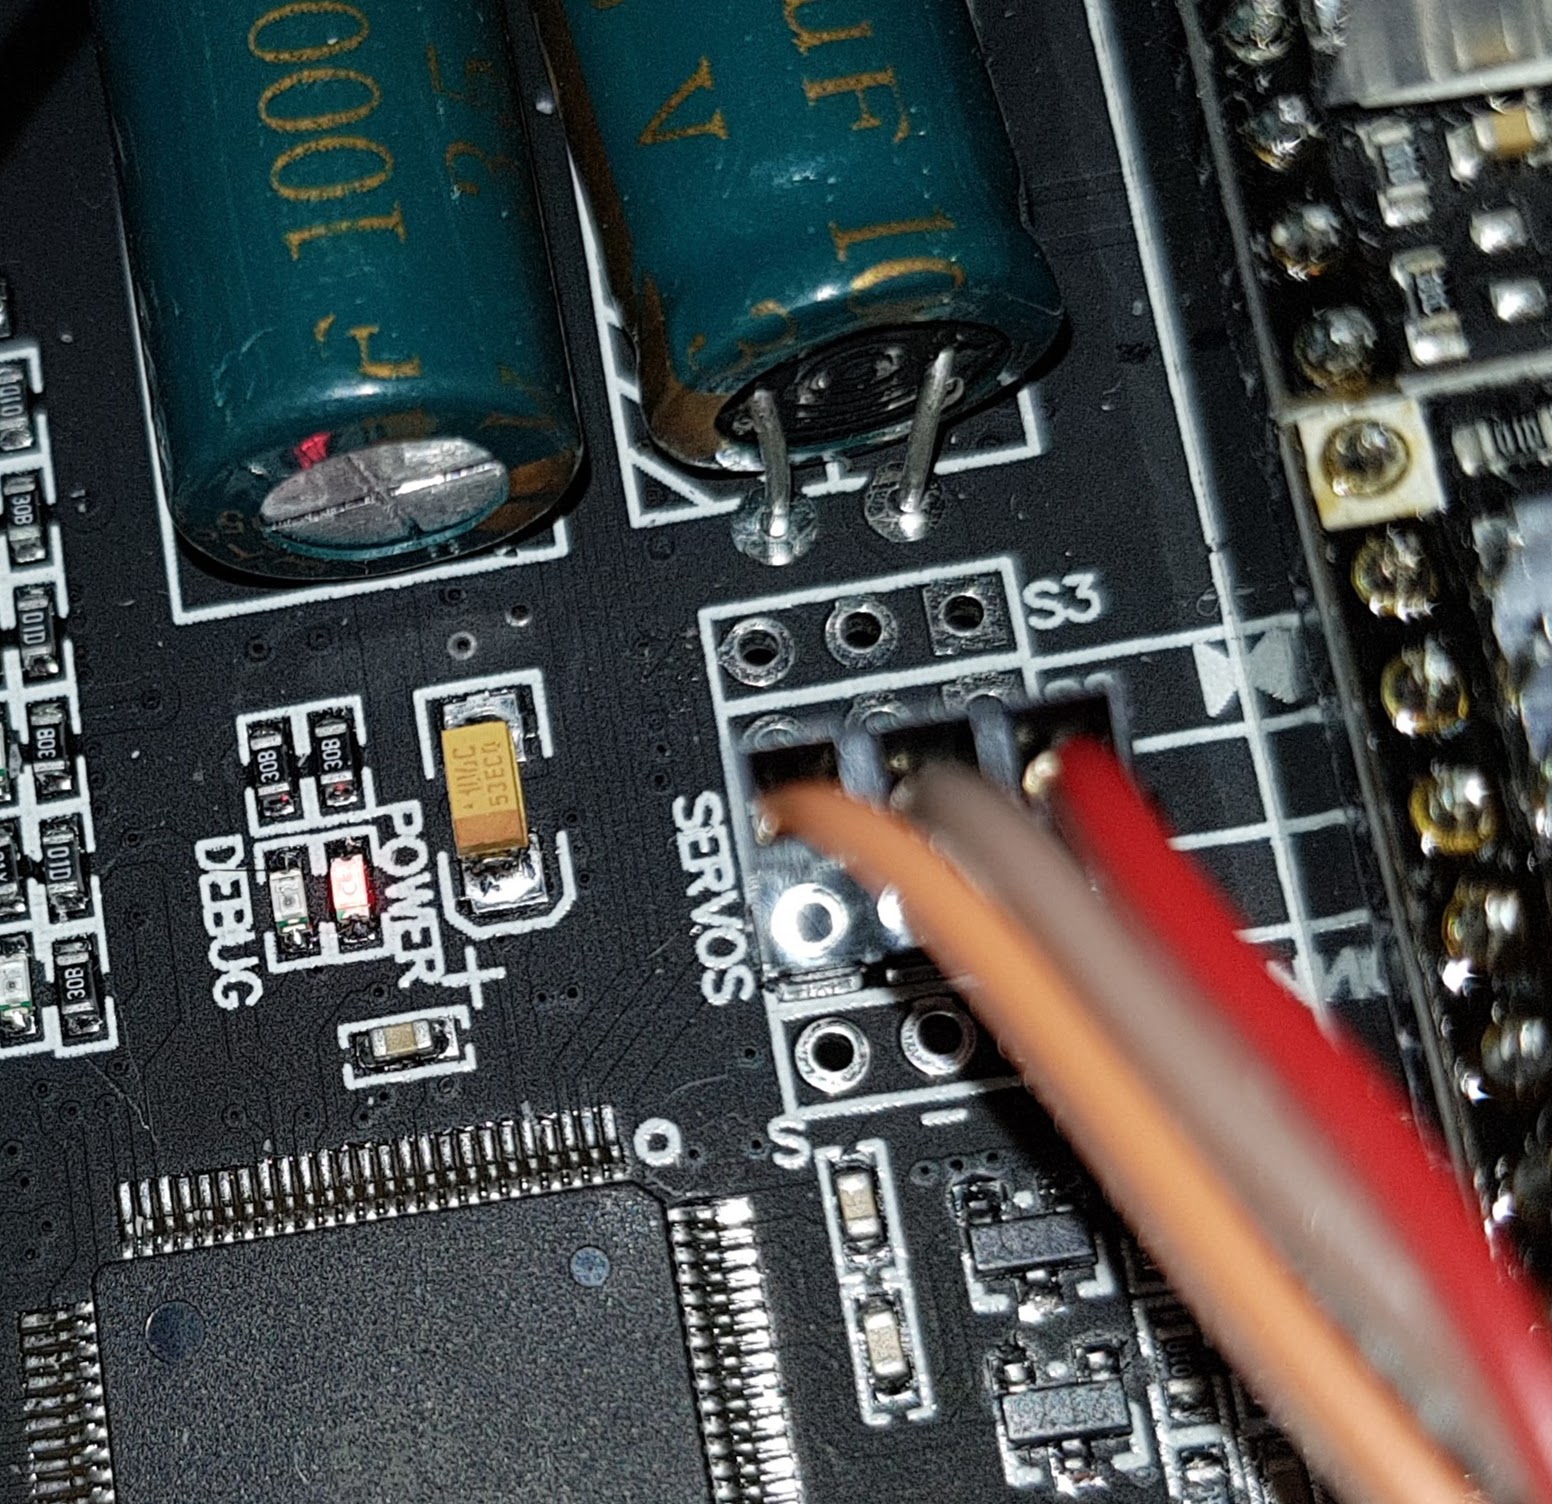
- Powering on system should make LED light red and move the pin a few times
Software (Marlin)
Using release from Anycubic: https://drive.google.com/drive/u/0/folders/0B8VIB533cgdMa1czMW5hNWlXYW8 Some of these may already be set.
#define MOTHERBOARD 43 // using 33 doesn't work

#define BLTOUCH // turn on probe

// these values strongly depend on your mount!
#define X_PROBE_OFFSET_FROM_EXTRUDER 36.1     // X offset: -left  +right  [of the nozzle]
#define Y_PROBE_OFFSET_FROM_EXTRUDER -29   // Y offset: -front +behind [the nozzle]
#define Z_PROBE_OFFSET_FROM_EXTRUDER -3.6  // Z offset: -below +above  [the nozzle]

#define XY_PROBE_SPEED 6000

#define Z_MIN_PROBE_USES_Z_MIN_ENDSTOP_PIN

#define Z_CLEARANCE_DEPLOY_PROBE   50 // Z Clearance for Deploy/Stow
#define Z_CLEARANCE_BETWEEN_PROBES 10 // Z Clearance between probe points

#define AUTO_BED_LEVELING_BILINEAR

// works better but still not ideal
#define SAFETY_MARGIN 5
#define DELTA_PROBEABLE_RADIUS (DELTA_PRINTABLE_RADIUS - sqrt(sq(X_PROBE_OFFSET_FROM_EXTRUDER)+sq(Y_PROBE_OFFSET_FROM_EXTRUDER)) - SAFETY_MARGIN )
//  #define DELTA_PROBEABLE_RADIUS (DELTA_PRINTABLE_RADIUS -10)
#define LEFT_PROBE_BED_POSITION -(DELTA_PROBEABLE_RADIUS)
#define RIGHT_PROBE_BED_POSITION DELTA_PROBEABLE_RADIUS
#define FRONT_PROBE_BED_POSITION -(DELTA_PROBEABLE_RADIUS)
#define BACK_PROBE_BED_POSITION DELTA_PROBEABLE_RADIUS
Test the probe works
Send G codes M280 P0 S10 and M280 P0 S90. Probe should extend on first command and retract on second.
Finding probe to hotend offset (Marlin)
- make a mark on the bed with a pen or sticker
- Move the hotend to this exact location (use G codes, e.g.
G1X10Y-10Z10moves the probe to X +10mm, Y -10mm and Z +10mm) - Put a paper under the probe and move it until the paper sticks a bit. Use
G1Z5,G1Z4etc. until you reach the paper - Reset all values to Zero:
G92 X0 Y0 Z0 - Move the hotend off the mark
G1Z10 - Now move the probe exactly over the mark using G codes like above
- once you are exactly on the mark extend the probe with
M280 P0 S10(if the probe doesnt move reset it withM280 P0 S260) - start lowering the probe slowly using
G1Z9,G1Z8etc. once you are close start adding decimals - when the probe activates note down the numbers on the LCD.
- In my case I had
X-36.1 Y 29 Z 3.6, now enter the offsets in Configuration.h (NOTE: X shows a negative, that means enter it possitve in Marlin, Y is entered as a negative. )
Trigger Auto Leveling
- Enable logging to see what is going on
M111 S247 - Zero Z, using
G28 - Level Bed
G29(useG29 V4to see more log info)
Update Slicer
- In your slicer make sure you set the printer to do a
G28then aG29before each print.
NOTICE: Doing a G28 resets the autolevel values! I am still trying to figure out how to get Octoprint to not reset my auto level values before printing.